There’s something incredibly cozy about a rainy day—the soft sound of raindrops, the calm light through the window, and that quiet invitation to slow down. And what better way to turn that peaceful moment into something magical than with stained glass glue window art?
This craft is one of those rare activities that checks all the boxes: it’s simple, affordable, creative, and leaves kids (and even adults!) feeling proud of what they made. Plus, when the sun finally comes out again, the colorful designs glow beautifully on the window—like homemade stained glass.
🧾 Ingredients & Supplies
You only need a few basic items to get started:
- Clear school glue
- Liquid food coloring (or washable paint)
- Transparent plastic sheet (sheet protectors or plastic folders work great)
- Toothpicks or wooden skewers
- Small cups or palette for mixing
- Black permanent marker (optional, for outlines)
- Dropper or spoon (optional, for detail work)
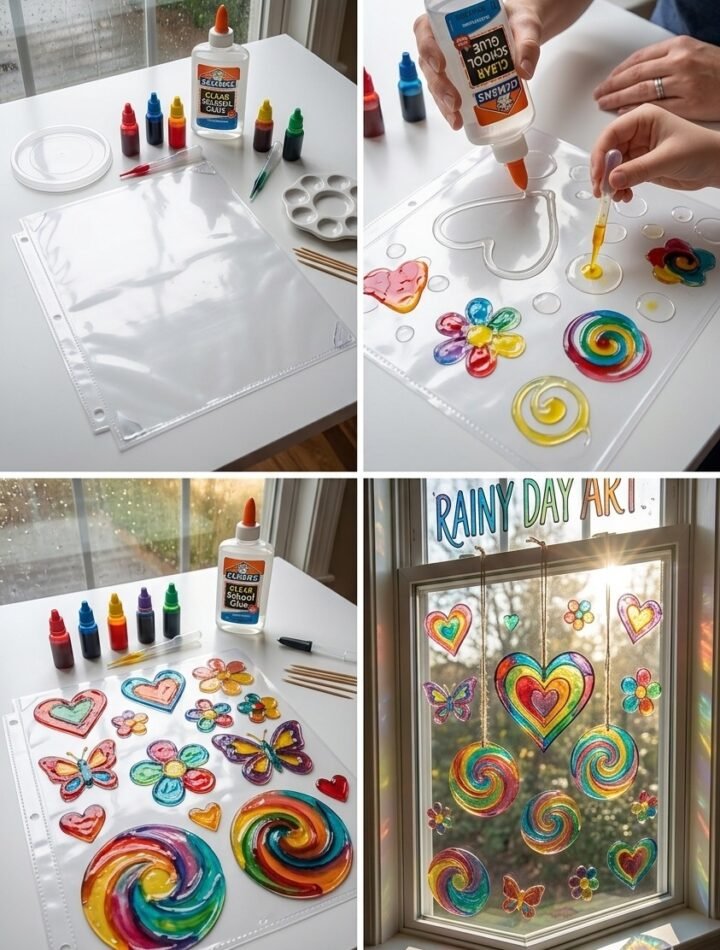
🎨 Step-by-Step Instructions
1. Prepare Your Workspace
Start by laying down your plastic sheet on a flat surface. This will be your “canvas.” It’s best to work near a window if possible—you’ll already start imagining how it will look hanging there later.
2. Mix Your Colors
In small cups, mix clear glue with a few drops of food coloring. Stir gently until you get vibrant, smooth colors. The more coloring you add, the richer the final look.
3. Create Your Design
You can go freehand or draw shapes first using a black marker under the plastic sheet (hearts, flowers, butterflies, spirals—anything fun!).
Then, slowly fill in your designs using the colored glue. Use toothpicks or skewers to guide the glue into shapes and smooth edges.
4. Add Details
Layer colors, swirl them together, or add dots and outlines for a stained-glass effect. This is where creativity shines—no rules, just imagination.
5. Let It Dry
Leave your artwork to dry completely (usually overnight). The glue will harden into flexible, peelable shapes.
✨ The Beautiful Result


Once dry, gently peel your designs off the plastic sheet. Stick them directly onto a window, or hang them using string. When sunlight hits them, they glow with vibrant color—like tiny pieces of joy dancing in the light.
💡 Tips for the Best Results
- Use thicker glue layers so your designs don’t tear when peeling
- Avoid too much water in coloring—it can weaken the structure
- Let kids experiment freely—imperfections make it more charming
- Try themed designs (rainbows, hearts, animals, or even names)
❤️ Why Kids Love This Craft
This activity isn’t just about making something pretty—it’s about the experience. Kids love watching colors mix, seeing their ideas come to life, and feeling proud when their art transforms a simple window into something magical.
It’s a little messy, a lot of fun, and full of creativity—exactly what a rainy day needs.